Dare we say the weather is cooling down? If you're a hiker keen on exploring the many trails and camps in the UAE or abroad, I am here to tell you that yoga can, literally, help you go a long way. Practising certain postures and breathing techniques before, during and after your outdoor adventure contributes to both physical and mental well-being, while allowing you to overcome nature's challenges and appreciate its bounty. Adding mindfulness to the practice will allow you to live in the moment and be more aware and appreciative of your surroundings.
The benefits of yoga for the avid hiker are many. It complements your training routine by helping to build strength, stability, mobility, flexibility and balance. The lengthening and strengthening of muscles and connective tissues helps maintain form and posture, and enables you to control your breathing on the trail.
Here are a few steps to follow and postures to practise.
Set your intention with mindful meditation
Before you start your day, after you set up camp, or when you take a break from the trail, engage in a few moments of silence with your eyes closed. Keep your ears open to the sounds around you, focus on your breath and relax your muscles. These are all simple but effective tactics to refresh you for the journey ahead.
Connect with your breath
Breathing exercises are also essential and help to improve lung capacity – a critical factor if you want to conquer long, steep trails, or when trekking at a high altitude. Carrying out diaphragmatic breathing stimulates the parasympathetic nervous system, which evokes a feeling of relaxation, increases oxygen delivery to the cells and stimulates blood flow, thereby nourishing the brain and other muscles.
In addition, deep belly breathing, if done regularly, strengthens and purifies the energy field, balances the chakras and helps overcome negative patterns. Practise abdominal breathing by lying on your back or sitting cross-legged with a straight spine. Place your right palm on your abdomen and your left palm on your chest. Close your eyes and focus on your breath. Breathe through your nose, expand the belly when you inhale and contract it when you exhale. Fill and empty your lungs by pushing the diaphragm in and out.
One of the simplest ways to keep a regular breathing rhythm as you walk, jog or hike is to synchronise each breath with your steps. As you step forward with your right foot, breathe in deeply and then step forward with your left foot. Exhale when you take another step with your right foot.
10 asanas to master
The poses listed below target the legs, knees, ankles, chest, back, and glutes - all areas used extensively during a hike – and help release tightness, prevent injury, maintain endurance and reduce muscle soreness.
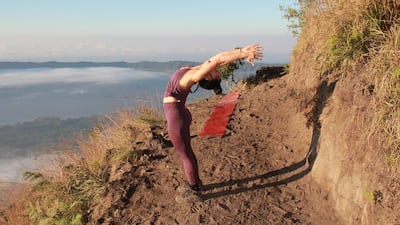
1) Standing backbend (anuvittasana)
This pose stretches the spine, neck, chest and shoulders.
Stand with your feet together or hip distance apart, place your hands on your lower back, fingers pointing up or down. Push your hips forward and bend back at the torso. Lift your chest up, squeeze your shoulder blades together – feel free to draw your head back, too. Engage your core to support the lumbar by drawing the belly into the spine. Hold for five to 10 breaths. If you can, raise your hands toward the sky or interlace your hands behind you to stretch your shoulders.
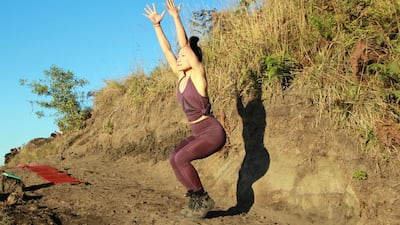
2) Chair pose (prapada utkatasana)
This pose strengthens the core, quads and glutes, builds the muscles and tendons around the knees, stretches the calves, top of the feet and ankles, and promotes balance.
Stand in mountain pose (tadasana). Beginners can start with their feet hip width apart; seasoned yogis can stand with their feet together. Sweep your arms overhead with every inhalation. Keep your palms facing inwards and join them. As you exhale, bend your knees, lift the heels up, and sink your hips back as if you were about to sit in a chair. Sit low enough for your thighs to be almost parallel to the floor. Engage your abdominals by pulling your lower belly in. Don’t worry if your muscles start to shake as you sink deeper into this pose. Continue this movement slowly for 10 repetitions.
3) Standing leg raise (utthita hasta padangusthasana)
This pose strengthens your psoas and glute muscles.
Stand with your feet together, toes pointed toward the front of the mat. Press the four corners of your feet into the floor. Squeeze your thigh muscles and pull your belly in towards the spine to support your lower back. Lift your right knee into your chest and extend your leg forward, flexing your toes.
Alternatively, after lifting your right knee to your chest, loop the index and middle fingers of your right hand around your right foot's big toe and place your left hand on your left hip. Hold for five to 20 breaths. To release, draw your knee back into your chest, then slowly lower your foot to the floor. Repeat on the opposite side.
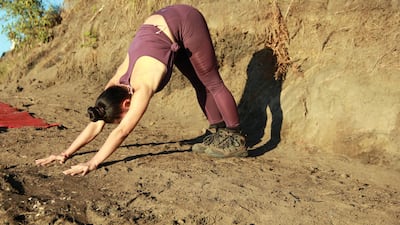
4) Downward-facing dog (adho mukha svanasana)
This pose works on the hamstrings and gives an all-over stretch.
The hamstrings control movement in your hips and knees and, as such, play an important role in improving flexibility and posture. By stretching and strengthening these muscles, you can achieve strong, limber thighs, preventing injuries and providing supporting as you trek uphill and downhill. Further, hikers who carry heavy loads compress their upper and lower back while moving up and down the rough terrain. This pose helps lengthen the posterior chain and the compressed chest caused by backpack straps.
Sit on the floor with your knees directly under your hips and your hands slightly ahead of your shoulders. Spread your fingers wide and press your hands into the mat. Tuck your toes and raise your knees off the floor. Lift your hips all the way up as you drop your chest back towards your thighs, forming an upside-down V position. Drive your heels toward the floor, but don’t worry if they don’t touch. Feel the stretch in your hamstrings and the lengthening of your back, and engage your core. Don’t let your head hang, just gaze between your toes or toward your navel.
To take it further, spread your shoulder blades apart, which will stretch your upper back; and reach your hips up and back, which will open your lower back. Stay here for about one to three minutes. Lower your knees if you get lightheaded.
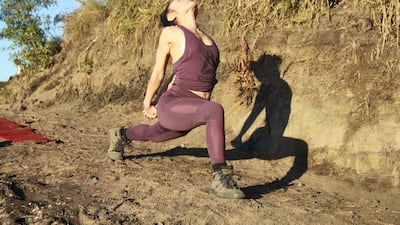
5) Open-chest lunge (anjaneyasana)
This stretch targets the psoas muscles to create length and flexibility in the hip flexors, and opens up the chest, especially useful if you’re carrying a heavy backpack.
Start in the downward-facing dog pose. On an exhalation, lunge your right leg forward in between your hands and lower your left knee to the ground. Keep your right knee directly over your right heel. On inhalation, raise your torso. Interlace your hands behind your back. On your next exhalation, allow your hips to settle forwards and down until you feel a stretch in the front of your left leg and psoas. Draw your tailbone done towards the earth, lengthening your lower back and engaging your core muscles as you draw your chest out. Hold for up to one minute. Stand back up before repeating on the left side.
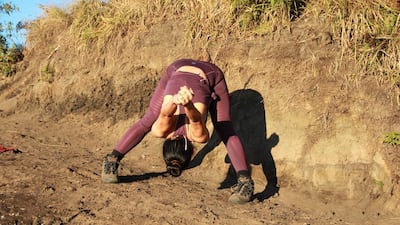
6) Forward fold (uttanasana) with arm stretch
This pose stretches the spine, shoulders and chest, and eases tension in the upper back.
Step with your feet three to four feet apart. Turn your toes slightly inward and heels slightly out. Engage the thigh muscles by drawing them up. Interlace your fingers behind your back. Inhale and lengthen your spine. Exhale as you fold forward from your hips, bringing your hands overhead and drawing your shoulder blades together. Keep your back straight and release your head down towards the floor. Hold this pose for five to 10 breaths.
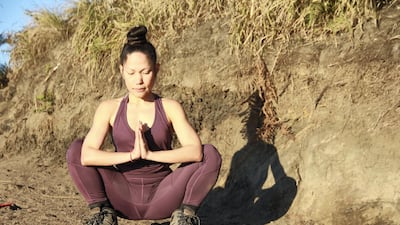
7) Garland pose (malasana)
Practise the so-called yogi’s squat mid-hike to release your lower back and hips from the repetitive movement of walking on uneven terrain.
Sitting on the floor with your legs together and stretched straight out in front of you. Bend both legs, one at a time, until the knees are pointing to the ceiling and the calves come close to the back of the thighs. Lean forward to raise your seat such that you squat on your feet. Elongate your spine and engage your core, with your hips hovering at whatever height above the ground feels good for you. Keep your knees in line with your ankles. Take your elbows inside of thighs, lightly pressing them out, and bring your hands together in prayer position at the centre of your chest. Keep your spine long. Breathe here for 30 to 60 seconds.
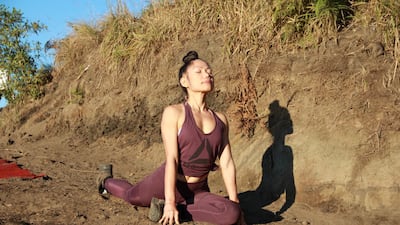
8) Pigeon pose (eka pada rajakapotasana)
This pose opens up the hips and hip flexors.
Start with a downward-facing dog, then bring your right knee forward towards your right wrist. Place your right shin on the ground. Extend your left leg back and point your toes, with your heel pointing to the ceiling. Square your hips toward the floor and flex your right foot. If your hips feel uncomfortable or are a few inches away from the ground, support the bent leg with a rolled-up sleeping pad or other makeshift prop. Walk your hands out in front of you, resting your weight on your forearms or resting your forehead on your fists. Hold for 10 to 20 breaths and repeat on the other side.
9) Butterfly pose (baddha konasana)
This pose stretches the groins and inner thighs, and releases tension in the lower back.
Sit with your legs straight out in front of you. Exhale, bring the soles of your feet together and pull your heels toward your pelvis, then drop your knees out to the sides and press the soles of your feet together with both hands and a straight back. With each exhale, gently press your knees and thighs toward the ground. You can use your elbows to support this opening. Hold for 10 breaths
10) Hero pose (virasana)
Finish your hiking with this posture, which strengthens the ankles, shins, knees and thighs, and lengthens the muscles and plantar fascia of the feet. This pose is not recommended if you have a knee or ankle injury.
Kneel on the floor with the knees touching and curl the back toes underneath (put a folded piece of clothing or blanket under your feet, shins or knees for added comfort). Slowly lower your glutes to sit on your heels and lower your body weight. Close your eyes and focus on your breath. Hold the pose for 30 seconds.
To know more, visit www.nerryfit.com
